How to Slice and Plate Iberico Ham Like a Pro
Iberico ham is worth the effort, but only if it is sliced thin and served at the right temperature. This guide walks you through setup, knife work, and plating so your slices look and taste their best.
Poin utama
- Set up a stable ham holder, a long flexible knife, and a clean board before you start.
- Slice thin, almost translucent pieces, cutting at a shallow angle.
- Serve the ham at room temperature so the fat softens and the flavour opens up.
- Plate in a simple, overlapping arrangement and avoid crowding the plate.
Iberico ham is one of those foods where presentation and texture matter as much as flavour. The meat is deeply marbled, the fat melts easily, and a thick, clumsy slice can taste heavy and chewy. Getting it right is mostly about patience and a few good habits, not special talent. Once you understand how the ham is built and what your knife needs to do, slicing becomes a calm, repeatable task.
Many people buy a leg of Iberico ham for a family gathering or a celebration and then feel nervous when it is time to carve. The good news is that the process is very forgiving once you know the basics. Thin slices, a sharp blade, and a stable setup solve most problems. This article covers how to choose and prepare the ham, how to slice it step by step, and how to plate it so it looks as good as it tastes.
Choose and Prepare the Ham Before You Slice
Start by understanding what you have in front of you. Iberico ham is sold in different grades, usually tied to how the pigs were raised and fed, and the label will often mention the diet and curing time. Higher grades tend to have more intramuscular fat and a richer, nuttier aroma, while other grades can be lighter and more everyday. If you are still deciding which one to buy, our guide to the best Iberico ham brands in Singapore can help you compare options before you commit.
Next, check whether the ham is bone-in or boneless. A bone-in leg is the traditional format and is usually sold with a hoof, which is useful because it gives you something to hold while you carve. Boneless portions are easier for beginners and fit better in smaller fridges, but they need a different approach because there is no bone to anchor the piece. Either way, you will need a secure base so the ham does not slide while you work.
Before cutting, remove the outer rind and most of the hard, dried surface if the ham has been exposed to air. Many people leave a thin layer of fat on the surface, since this is what keeps the meat moist as you slice. Remove only the parts that look dry, dark, or tough. Work slowly and take off small strips rather than trying to remove a big piece in one go, so that you do not cut into the good meat underneath.
Set aside the tools and surfaces you will need. A ham holder, sometimes called a jamonero, keeps the leg stable and at a comfortable height. If you do not have one, a sturdy cutting board and a folded towel underneath can work for a boneless piece, but make sure nothing wobbles. You can also look at general shopping ideas and advice for kitchen tools if you are building a basic setup from scratch.
- A ham holder or a stable base that will not slide on the counter
- A long, thin, flexible carving knife with a sharp edge
- A second, shorter knife for trimming fat and removing the rind
- A clean cutting board or the holder's own surface, kept dry
- A clean, chilled or room-temperature serving plate, depending on your plan
- Paper towel or a clean cloth to wipe the blade between cuts
Slicing Technique Step by Step
The knife matters more than most people expect. A long, flexible carving knife lets you make one smooth pass without sawing, which keeps the slice intact and the edge clean. A serrated bread knife tends to tear the meat and creates ragged edges, so it is best avoided. Make sure the blade is sharp before you begin, and keep a honing steel or sharpener nearby so you can refresh the edge between sessions.
- Langkah 1Stabilise the hamPlace the leg firmly in the holder with the cut surface facing up or to the side, depending on which section you are working on. Make sure it does not rock when you press gently on it.
- Langkah 2Expose a clean surfaceRemove the outer rind and any dry, dark edges in thin strips. Work from the top of the leg, and keep the fat cap intact where it covers the good meat.
- Langkah 3Cut thin, angled slicesHold the knife at a shallow angle to the ham, then draw it in one long stroke from heel to tip. Let the blade do the work instead of pressing down hard.
- Langkah 4Lift and set asideUse the tip of the knife or your fingers to lift each slice gently, then lay it on the plate or a tray. Keep the slices in small, neat stacks so they stay together.
Thin slices are the goal. Iberico ham is rich, and very thin pieces let the fat melt on your tongue rather than sitting heavy in the mouth. Aim for slices that are almost translucent, and if you can see your fingers through a piece, you are close. Thick slices are chewy, and they hide the marbling that makes this ham special. If your first few pieces come out uneven, do not worry; the consistency improves quickly with practice.
Angle matters as well. Holding the knife at a shallow angle lets each slice be wide and thin, and it helps you follow the grain of the meat. If you cut straight down, you will get small, thick pieces that break apart easily. Take your time on the first few slices to find the right angle for your knife and the shape of your ham. Once you find it, keep the same rhythm for the rest of the leg.
Work across the ham in a steady pattern rather than jumping around. Many carvers start at the top and move down toward the hoof, which keeps the leg balanced and the exposed surface consistent. As you go deeper, the meat may look more uniform, so you can slice slightly thicker if you prefer, but the marbling near the surface is usually the most delicate and rewarding part. If you notice the meat drying at the edges, cover the exposed area with the rind or a thin layer of fat while you pause.
Plating and Serving Like a Pro
Good plating is simple. Iberico ham already looks beautiful, so you do not need heavy garnishes or complicated arrangements. A plate with a clean edge, a few neatly overlapping slices, and a small amount of contrast is enough to look restaurant-quality. Avoid piling the slices high or crowding the plate, because the thin pieces can tear and the fat can sweat together into a greasy mass.
Temperature is the most overlooked part of serving. Cold ham is firm, and the fat stays solid, which mutes the aroma and makes the texture feel waxy. Let the slices sit at room temperature for about 20 to 30 minutes before serving, so the fat softens and the flavour opens up. Keep the rest of the leg covered between servings so the exposed meat does not dry out. If you are serving a crowd, slice only what you expect to use in the next hour or so.
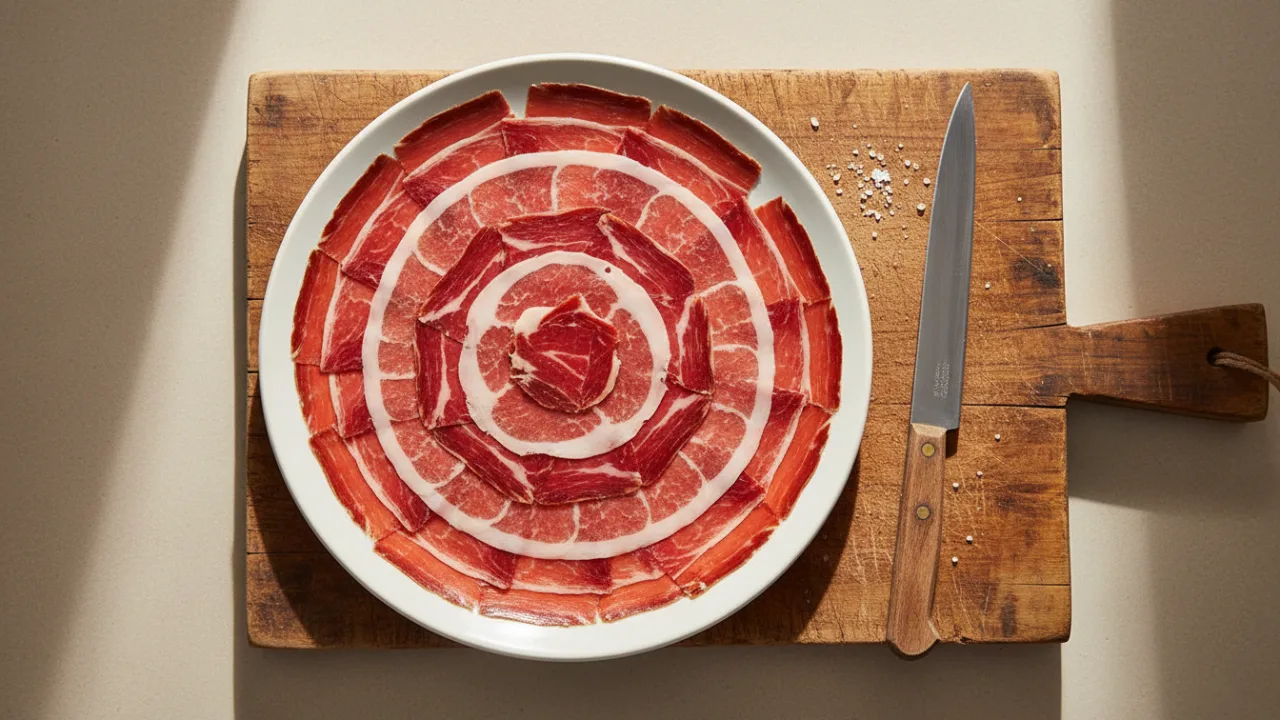
For the arrangement itself, try a gentle fan or a loose spiral. Lay each slice slightly overlapping the one before it, and leave a small gap at the edge so the plate does not look overcrowded. If you like contrast, you can place a small amount of crusty bread, lightly toasted, on the side. Keep other additions minimal so the ham stays the focus. Our general shopping ideas and advice pieces also cover how to pick plates and serving ware that complement a simple spread.
Thin slices served at room temperature do more for Iberico ham than any garnish ever will.
When you plate, think about the order in which guests will eat. Place the slices closest to the rind and fat near the top of the plate, where they are easy to reach, and keep the leaner, deeper-coloured pieces nearby so people can taste the difference between sections. This small touch helps guests appreciate the ham more and makes the plate look intentional. If you are serving on a board, group the slices by section so the difference in marbling is visible.
Cleanup is part of the process too. Keep a separate knife and board for the ham if you are also handling other raw meats, and wipe down the holder and surfaces once you are finished. Store any leftover ham wrapped tightly in the fridge, and bring it back to room temperature when you want to serve it again. A little care at the end keeps the next session just as easy as the first.
If you are still deciding on the right tools or want help narrowing down what to buy, you can always reach out to us with your questions. A few small adjustments to your knife, your board, and your serving temperature will make more difference than any single expensive gadget. Start with thin slices, keep the ham at room temperature, and let the simple presentation do the work.
Pertanyaan umum
What is the best knife for slicing Iberico ham?
A long, thin, flexible carving knife is the most practical choice. It lets you make smooth, single strokes that produce clean, thin slices. Avoid serrated knives, because they tend to tear the meat and leave ragged edges.
How thin should I slice Iberico ham?
Aim for slices that are almost translucent. Thin pieces let the fat melt easily and bring out the flavour, while thick slices can feel chewy and heavy. Consistency matters more than perfection, and it improves with practice.
Should Iberico ham be served cold or at room temperature?
Serve it at room temperature. Let the slices sit for about 20 to 30 minutes before eating so the fat softens and the aroma becomes more noticeable. Cold ham can taste firm and muted.
How do I keep the leftover ham fresh?
Wrap the exposed meat tightly and store it in the fridge. Keep the rind or a thin layer of fat on the cut surface if you can, and bring slices back to room temperature before serving again.